

How to use the Manual
Quick Guide
Video Tutorial
Iceberg Features
In-depth analysis
Brokers
Data Feed
Other Manuals of beeTrader Trading Platform
How to use the Manual
Quick Guide
Video Tutorial
Iceberg Features
In-depth analysis
Brokers
Data Feed
Other Manuals of beeTrader Trading Platform
 Aggiungi questa pagina al tuo libro
  Rimuovi questa pagina dal tuo libro
 Iceberg in this section provides the user a simple but powerful system to automate the trading in options. It also allows to non-programmers to create set certain moves which will be executed automatically. For users with more knowledge a scripting system will be available.
 | 24/03/2016 | Planning - L'area di lavoro | 6:22 |  |
| 24/03/2016 | Planning - Il grafico del futuro! | 9:35 | |
| 24/03/2016 | Planning - Esempio di Utilizzo | 6:53 | |
Click here to watch other Video di Iceberg

 | it opens the submenu Strategy |
 | it creates a new Strategy |
 | it allows to open a previously saved Strategy |
 | it allows to save the Strategy currently in use |
 | it opens the window Strategy Settings for the strategy settings |
 | it opens the window What-If History where there are stored all the transactions carried out by the function What-If |
 | It enable or disable the Planning function, whether the button is highlighted the function is active. |
 | it creates a new Plan for the Strategy |
 | it allows you to edit the selected Plan |
 | it delete the selected Plan |
 | it confirms the changes made to a Plan |
 | it cancels the changes made to a Plan |
 | it allows you to enter the starting point of the Plan |
 | it allows you to enter the end point of the Plan |
 | it allows you to insert a condition in the Plan |
 | it allows you to enter an action in the Plan |
 | it allows you to place an hub for the links of the Plan |
 | it allows you to insert a link between the starting point of the Plan and the condition, between the action and the end point and between actions. It connect the components of a Plan which are not subject to a decision (Yes or No) |
 | it allows you to insert a link between conditions and actions, in case the condition is verified |
 | it allows you to insert a link between conditions and actions, in case the condition is not verified |
 | it delete the selected object of the Plan |
 | it allows you to move the selected item to the first level, therefore in foreground |
 | it allows you to move the selected item to the last level |
 | it allows you to advance the selected object of a level |
 | it allows you to move down the selected object of a level |
 | it resets the zoom |
 | it starts the Plan Test |
A Plan consists of various objects that indicate the logical sequence and then how the sequence will be evaluated and executed. We see below what items make up a Plan and their properties.
By clicking the button  you can enter the Start object
  .
.
 When Start object is selected, as well as the End object, it appears a sidebar with the general settings of the Plan.
You can only enter a Start object into the Plan, which must be concluded with an End object but you can enable more Plans at once.
By clicking the button  you can enter the End object
  , which must be entered to complete a Plan.
When Start object is selected, as well as the End object, it appears a sidebar with the general settings of the Plan where you have to set its name and how many minutes must elapse between a check of the plan and another.
By clicking the button  it is possible to insert the object
  , which contains the condition that will have to be verified. From a Condition object can exit a “Yes” link, which will be connected to the action to take if the condition is verified, or a “No” link, which will be connected to the action to take if the condition is not verified.
 When “Condition” object is selected, a sidebar with the settings will appear. You have to complete the field.
Operand 1: you have to assign the first term of the comparison, It can be a property of an Asset, a property of a Strategy, a property of a Plan or a Custom value setted by the user;
Operator: You have to choose the mathematical operator;
Operand 2: you have to assign the second term of the comparison, It can be a property of an Asset, a property of a Strategy, a property of a Plan or a Custom value setted by the user;
Object Text: in this field you can assign a short note that will be displayed in the Plan within the object Condition;
Preview: it shows shows the preview of the selected condition.
By clicking the button  it is possible to insert the object “Action”
  , that is the object in which to place the action that will be executed whether the previuos condition is verifcated (Yes Link) or not (No Link)
 When the Action object is selected, in the right sidebar we have a list of all actions that can be assigned to it and its settings
For every “Action Type” are available some “Action Settings”. In “Action Settings” are collected all settable parameters related to the “Action Type” selected.
 For Buy and Sell Actions there is the Smart Move function that automatically change orders according to your settings. For more informations on Smart Move, system click here.
By clicking  it is possible to insert the object “Junction”
  for the “Link”. The Junction needs only to improve the look of a Plan in case there are many links with some overlap


A Plan can be: Active but disabled, Active and Enabled, Inactive, in Editing or Working. The status of each plan is shown to the left of the name and it is of immediate identification. When a plan is activated and enabled the system evaluates the set condition and executes related actions while in all other cases it does not take place no verification.
If a Plan is in the process of editing Iceberg is not checking the conditions set. In order to exit from “Editing” you have to press “Apply Changes” if you want save your changes or press “Cancel Changes” to delete them.
When a Plan runs it takes the status of Working.
Now let's see how to proceed to the implementation of a Plan by analyzing all the steps to proceed correctly.
Since the Plan will establish the rules / conditions the occurrence of which will be carried out actions (buy or sell futures, stock ok options), basic requirement for the proper operation of the Plan is that the section General must contain all asset which will be used in it.
| Example: the initial strategy is composed by 5 put strike 10, we suppose when the condition xyz happen the plan will close put 10 and it will roll the put on strike 9. To do this, it is necessary that in the strategy are present put 10 and 9 |
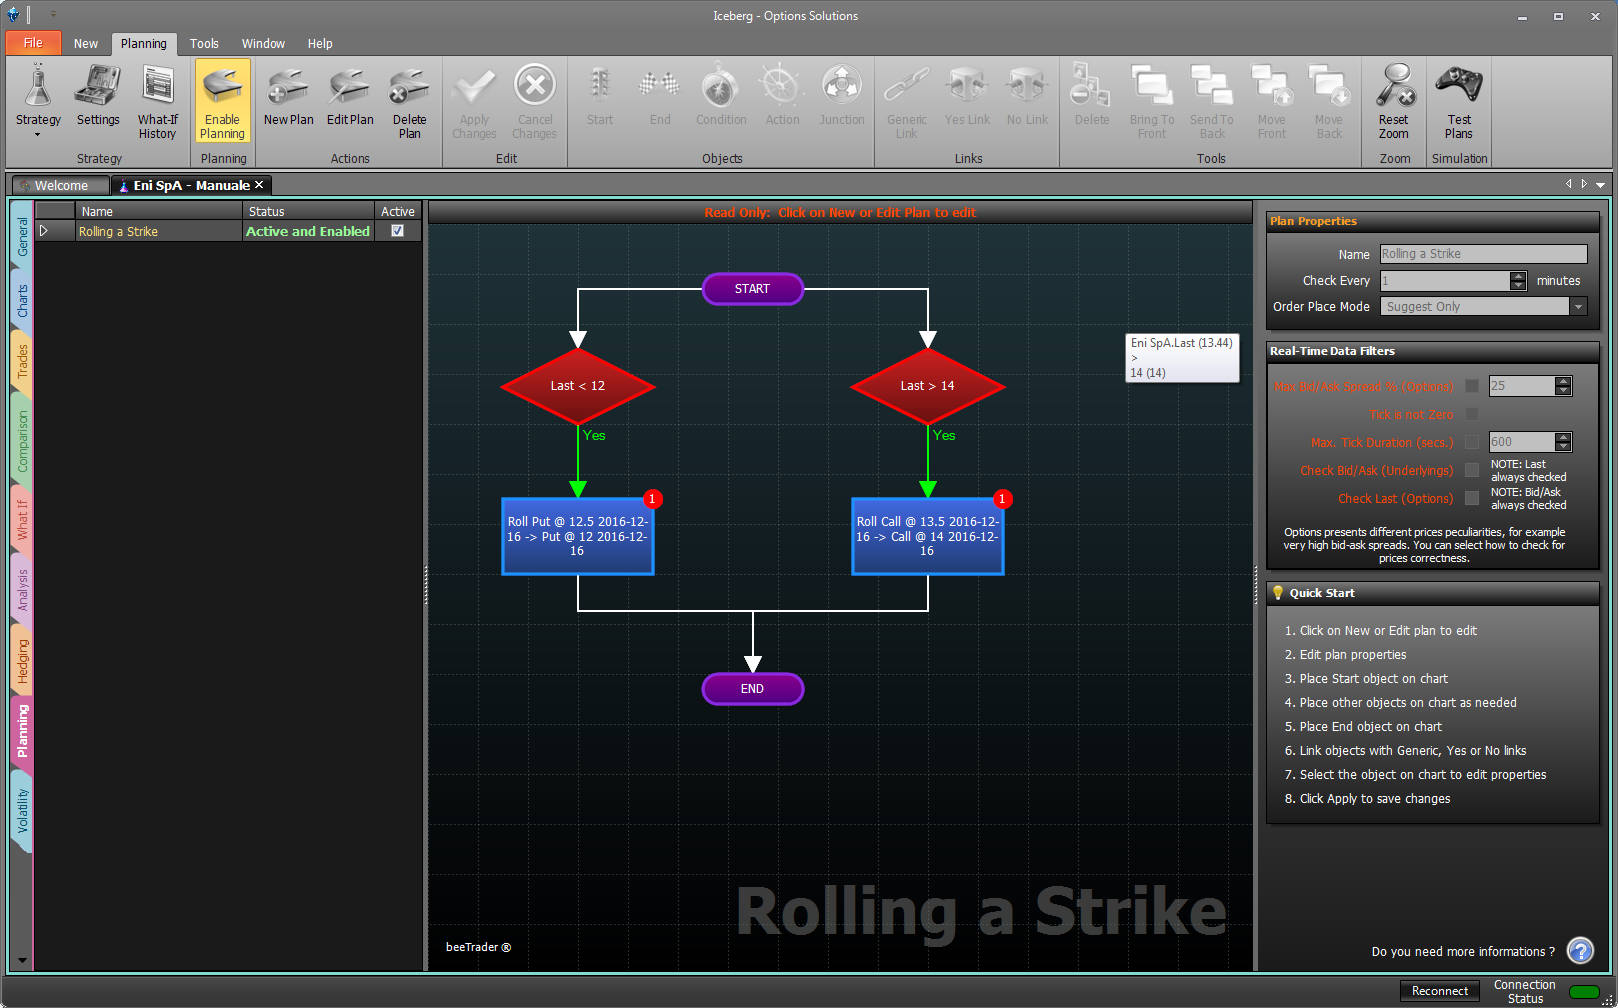
 As you can see from the image in the strategy there are the puts sold 10 and the put 9 (with quantity zero).
To add an option with quantity 0 you must click on the “+” button of Options Chain.
From the section Plan first click to create a new Plan.
 The newly created Plan is under Editing, the first thing to do when you create a Plan is to give it a name because in the case of more plans on a same Strategy, these are listed and sorted by name.
Once assigned the name we have to proceed with the insertion of the object Start with the button .
At this point we insert the object Condition with the button .
 We must assign the parameters that the Plan will verify. For example suppose when the underlying Eni will arrive at 10 we want that the Plan will do a thing (which will be speciefied).
In Operand 1 we choose AssetsProperties → Eni → Last (the Preview shows the current value), in Operator we choose ⇐, in Operand 2 we choose AssetsProperties → La Put 10 → Strike (the Preview shows the current value).
In the Preview, on the low, we can read what we have set, if it is alright we press “Confirm” to save the conditions.
Every object must be connected to each other, with the button .
In the example there are two conditions equal to show the operation of the “Text” Object [Optional] so, everything is written here is placed on the sketch of the plan in order to make easier the lecture.
After we insert the object Action with the button .
 Now we must assign the action that the Plan will run upon the occurrence of the condition set above. In the example we used a green , so the action will be executed whether the condition will be verified. It also possible to insert a red . In this case the action will be executed whether the condition will not be verified.
In order to execute a rolling, we have to set Put 10 in “flat” and Put 9 in Leg to Open.
There are other parameters to set, for example “Preserve” which needs to keep the initial premium (however you can set a maximum number of contracts in in “Max Quantity”), or the number of contract. In the exemple the plan Nell'esempio il plan will attempt to sell the same initial premium but with a maximum of 10 contracts respect to the inital 5.
In “Reps” we sets the number of times the action have to be performed. Finally we click “Confirm”. On the figures of the actions are present red circles on which are reported the number of repetition still to be executed.
At this point we have to conclude the plan with the object .
 Using the button it connects the object End. Now the Plan is complete but it is still in Editing. In order to enable it we have to confirm the changes with the button .
Once we have create a plan we can test it.
In Iceberg, just for this purpose, there is the Simulation function. The user can create a graph of the underlying in order to check how the plan perform in every market condition that he think it can happen. The options are priced with Market Maker an exclusive of Iceberg.
 | it allows to add a graphic segment, The dates and the prices of begin and end are to be set |
 | it allows to remove a previously-added segment of the chart |
 | it allows to generate a new graph with the same parameters of the segments that compose it |
 | it allows to choose which expires highlight on the underlying graph |
 | it allows you to restore the original zoom on the underlying chart |
 | it saves the underlying chart in image format (*.png) |
 | it allows to print the graph of the underlying. Feature available on the PC in use if there is a printer |
| it restore the original zoom of the payoff |
 | it enable or disable the crosshair for the payoff |
| it allows to save the payoff in image format (*.png) |
| it allows to print the payoff. Feature available on the PC in use if there is a printer |
 | it remove a previously-added segment of the chart |
 | it allows you to place the simulation on the previous step of the underlying chart |
 | it allows you to place the simulation on the next step of the underlying chart |
 | it allows you to enable scrolling point by point of the underlying graph |
 | it allows you to disable the scrolling point by point of the underlying graph |
 | it opens the online manual page on the default Internet browser |
 In this section the user can set the different segments that will make up the underlying graph. For each segment, you can set start and end date, start and end price.
In while you create the segments, the graph is composed randomly, assuming the trend of the underlying between the dates and the prices set by the user.
The fields Start Date, End Date, Start Price e End Price are editable, others fields are calculated and gives an indication of the deviation of prices set.
 In the Plan Preview the user can verify every point of the graph of the underlying if the condition occurred. With the mouse wheel you can zoom the plan.
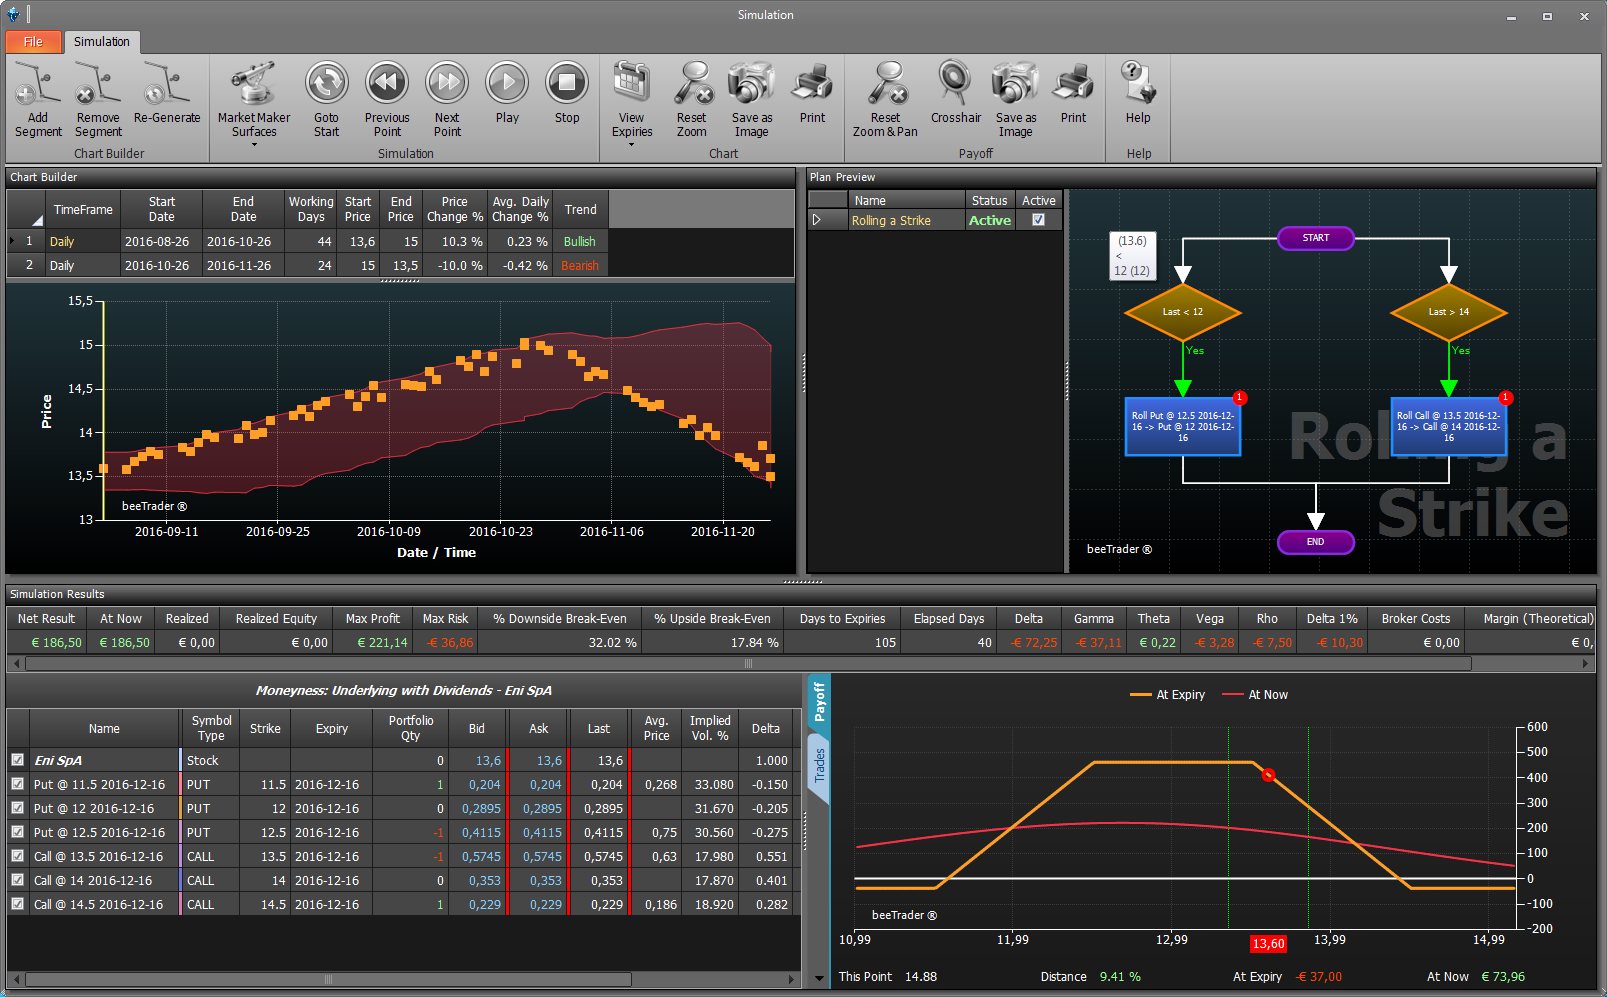
In this section the user can check for each point of the underlying chart the parameters of its strategy, and possible actions of wotkflow.

In the two images we see the difference between the initial strategy and after the execution of the simulation. At first the strategy was composed of 5 short put with strike 10 and with underlying at 12,8. Proceeding with the simulation the underlying went to 9.84 (therefore less of the put strike) so, as set in the plan, put 10 were bought and put 9 were sold sono state ricomprate le put 10 e vendute le put 9, maintaining the initial premium. The payoff has been kept selling 8 contracts.

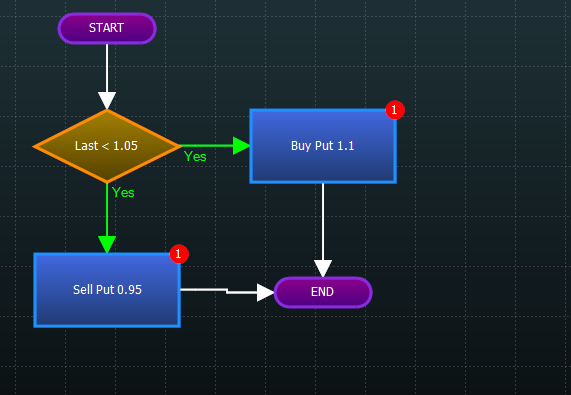 | To perform two actions upon the occurrence of a single condition you can use two links Yes. They exit from the conditions and they connect two actions. In the example at the occurrence of Condition Last < 1.05 , the Put 1.1 is bought and Put 0.95 is sold |
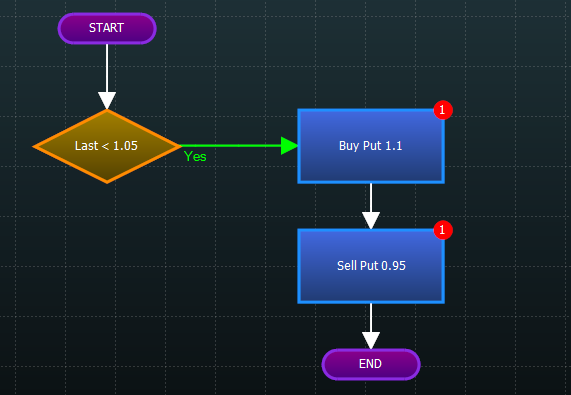 | You need to connect the first action to the second via a Generic Link. In the example the action “Sell Put 0.95” is executed only if the “Buy Put 1.1” action is already executed . The Plan, when the condition Last < 1.05 is satisfied, first it buy Put 1.1 an then it sell Put 0.95 |
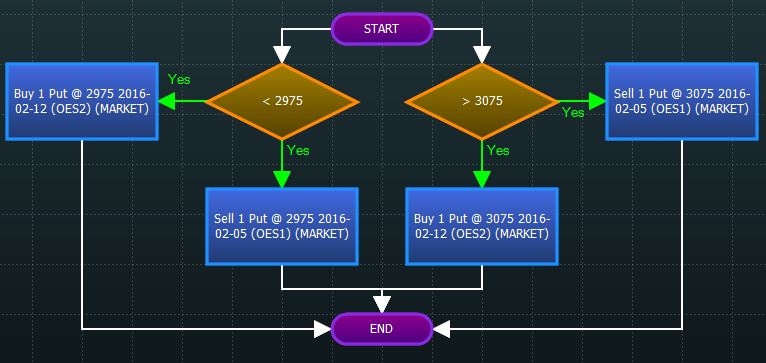 | You need to connect to Start two singles Actions, in the example of DJ Euro Stoxx 50 the Plan is composed of two single Conditions (< 2975 o > 3075). Una volta impostare le due Condizioni collegare le relative Condizioni come visto negli esempi precedenti con Link Yes in quanto si desidera che le Azioni siano eseguite al verificarsi delle Condizioni. In the example the various conditions have been linked separately and not in sequence (as in example 1) |

 Mostra, modifica libro (
 Aiuto
Aiuto